I absolutely LOVE to cook. Anyone who follows this blog knows this. And I LOVE when folks love my cooking. The same can be said for my baking skills. I've developed a family reputation for baking cupcakes. And quite frankly...I typically use a boxed mix. Not gonna lie! I usually doctor them up a bit, and I ALWAYS make my icing from scratch. Never, ever, ever do I use canned icing. Ever. Never. Because honestly...homemade butter cream icing is so simple...why would I do anything else? I have found however, a chocolate cake recipe that I will make forever. It's just that good. And like just about everything else I make in the kitchen, I got the recipe somewhere...and then made it my own. So if it sounds vaguely familiar...I'm sorry. After playing with it for the last year or so, it's officially mine. And I don't even know who to give original credit to.
So my baby sister sends me a text a few weeks ago. She's hosting a jewelry party at her house, and wants me to bake some cupcakes. Chocolate please...with sparkly icing! So of course...I said yes! Why not? I love jewelry, I love cupcakes, and I LOVE sparkles!
With this recipe, I usually have all of the ingredients in the pantry so I can whip it up pretty quickly. For the cake you'll need the following:
2 1/2 cups flour
1/2 cup unsweetened cocoa powder
1 teaspoon baking soda
1/2 teaspoon salt
1 cup butter (2 sticks), softened
2 cups sugar
4 eggs
1 cup sour cream
1/2 cup + 2 tablespoons milk
2 teaspoons vanilla extract
This recipe makes 24 "jumbo" cupcakes, or 36 "normal" size cupcakes.
Preheat the oven to 350 degrees.
In a medium size bowl...mix the flour, cocoa powder, baking soda, and salt. A trick I learned from none other than Martha Stewart...stir this all with a wire whisk. It's almost as good as a sifter! Really!
Beat the butter and sugar with the electric mixer. I have a wonderful stand mixer...yay me! But if you don't it's ok. Use what you've got. Do this on medium speed for about 5 minutes, or until it's light and fluffy. Beat in the eggs one at a time. I suggest stopping after this step to scrape the sides of the bowl. You just want to make sure everything gets mixed well.
Next you'll mix in the sour cream, milk, and vanilla. Hint...make sure that you get a good heaping cup of sour cream. You'll find that sometimes when you're spooning it into the measuring cup it leaves air pockets. No big deal...but if you don't have enough of the sour cream, your cake won't be as moist.
Scrape the sides of the mixing bowl again and then slowly add the flour mixture with the mixer on low. Don't over beat. I suggest that you scrape the sides one more time, and then mix for another few seconds to ensure that everything is incorporated. At this point...while I absolutely cannot condone eating anything with raw eggs...I usually taste the batter. And for the record...my mouth is watering thinking of that taste right now. Mmmmmm...
Scoop the batter into your prepared paper cups, filling each about 2/3 to the top. Bake for 20 minutes, or until a toothpick comes out clean. Set these on a wire rack to cool. You don't want to try icing them until they're not even close to warm. Spiderman is NOT a required team member...but he doesn't hurt.
While your cupcakes are cooling...it's time to make your icing. In the interest of full disclosure...I had a very hard time putting together the recipe for my icing. I typically make it by sight. Really. I do. But I wanted to share how easy it is, so I lovingly measured out each ingredient just for ya'll. You're welcome!
Three simple ingredients: 2 cups of powdered sugar, 1 cup (2 sticks) of salted butter - softened, 1/2 teaspoon (or 1 cap-full) of vanilla. That's it!
In your mixing bowl cream the butter on low. Just long enough to make it smooth with no lumps. Then add the powdered sugar on low. And then the vanilla. Mix it on medium for about a minute or two.
This is where your icing is going to play shift and mix a bit. Depending on how warm it is in your house. Or how humid it is outside. Or if you're in the mountains, or by the ocean...or how long you let your butter soften. All of these and none of these variables will determine the consistency of your icing. Be prepared to add a touch of water if it's too thick. And if it's too thin...add a little more powdered sugar. Also keep in mind that if you're adding food coloring, that's a little more liquid too.
Once your icing is to the desired consistency and color, it's time to ice the cupcakes! I'm no cupcake artist, but I do keep decorating bags and tips handy. It's super simple to make a little star right on top. And then sprinkle whatever you want on top.
Now set out your cupcakes and watch them be devoured! They were very much appreciated at Angela's jewelry party...and I'll be making these again this weekend (with a more masculine theme) for my precious three year old's Captain America birthday party.
******Surprise tip of the day:
Substitute 1 ounce of red food coloring for the "+2 tablespoons" of milk and you've got red velvet cupcakes. Make a cream cheese icing (if you'd like a recipe...let me know) and it's as good as any you'll find at a bakery!
Wednesday, June 4, 2014
Wednesday, May 14, 2014
MAMMAW'S POTATO SALAD!
For as long as I can remember my family has included potato salad into every holiday menu. Be it Thanksgiving, Christmas, Easter, 4th of July, or any big meal. Having a shrimp boil? Make potato salad! Gonna grill? Make potato salad!
And my Mammaw always made it for the family. As I grew up, I learned the art myself. Funny part? I can't stand potato salad! Oh yeah! You read that right! I won't touch the stuff! Because my Mammaw loved me, she'd always take a few of the warm potatoes out of the pan and coat them with butter...just for me. And then she'd make the potato salad for everyone else.
So I couldn't think of anything better for our little picnic tomorrow than potato salad. And it's really so simple to make. The hardest part for me was actually measuring each of the ingredients, so that I could share them with you. I normally make this one by sight. Then I take a little taste to my mother, and she lets me know if I need to add anything else. 99% of the time...I don't have to add a thing. I also had to make a much smaller recipe than normal. I'm not used to making anything less than five or ten pounds of potato salad at a time.
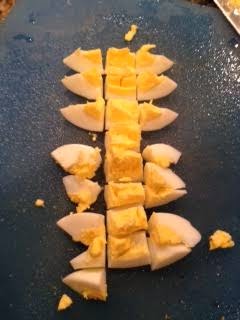
For this batch...my ingredients are approximately 3 pounds of potatoes, 1 boiled egg, 1 cup of chopped onion, 1 cup of chopped pickles, 1/2 teaspoon of salt, 1 teaspoon of lemon pepper, 1 tablespoon of mustard, and 1 cup of mayonnaise.
Go ahead and start the egg to boil. You want it to be fully cooked. No runny yolks! Then peel and chop the potatoes. I use russet potatoes normally, but you can mix it up a bit if you want. Chop them about 1/2 to 3/4 inches in size. Not too small. Put them in the pot, cover them with water, add 1/2 teaspoon of salt and start them boiling.
You'll want the potatoes to be fork tender. As soon as they're done, drain the water and set them aside.
While they're boiling, you can chop the onions and pickles. Don't chop them too finely you want nice chunks.
Put the cooked potatoes, the chopped onions and pickles, and the mayo and mustard in a bowl and mix. Add about 1/8 teaspoon, or less, of salt, and 1 teaspoon of lemon pepper. Peel and chop the boiled egg and then we're going to add Mammaw's secret ingredient...1 tablespoon of pickle juice!
Now stir it all together. It's ok if the potatoes are still hot when you start this. And they'll mash a little as you stir. It's ok! That's the best way.
Because we're taking this to a picnic, I'm just going to leave it in a transportable bowl and refrigerate it overnight. But my Mammaw would put it in a pretty boat bowl and sprinkle it with a bit of paprika.
You can serve it warm, or cold. Either way...I promise it'll be a big hit!
Tuesday, May 13, 2014
Is a Perfect Pot Roast Possible?
As with everything else in this world, it's always best when we food-lovin' cooks own up to our short-comings. Come on! You can do it! Admit it! There's something that you just can't master. I'll start...I have a whole list. Just don't tell anyone! Ok?
First...I am horrible with breads. I can bake any kind of cake, cookie, or pie I set my mind to. But my bread always turns out like crackers. And unless you're desiring crackers...that's not a good thing! In the last couple of years, I've finally discovered the fine art of cornbread. Which is good...living here in the South.
I also stink at steak! Doesn't matter what kind, or if it's on the grill, stove or oven. I simply cannot make an awesome steak. My husband can. But don't let that get out...or he'll never let me live it down!
And last (for now!) I have never made a perfect pot roast. Ever. At least not anywhere but in my crockpot. I'm not a crockpot queen. I don't have a million recipes for it. But the one thing I know I can make successfully almost every single time...is a pot roast.
The ingredients are so simple, you'll think you're doing something wrong. My roast, like my steak, I like to keep a true beef flavor. Nothing fancy. No overwhelming flavors. I just use salt, pepper, and at least one whole onion. That's it!
Before starting, you need to make sure that your roast will actually fit into your crockpot. If not...your cook time is going to vary greatly. Experience has taught me this. If it's bigger than your crockpot, and thicker than you anticipated...you'll have to cook it much longer. I recently made this particular mistake...and my kiddos had frozen chicken nuggets with their deliciously roasted potatoes and carrots. Although, when the roast was done...it was PERFECT!
If your roast isn't defrosted. It's actually a-okay. Just start the cooking a little earlier, or just be prepared to eat a little later. A frozen roast will increase the liquid in your pot.
If you are going to cook your roast all day while you're at work, turn the heat on to low. If you want it done in just three or four hours, go ahead and start it on high.
Thickly chop your onion into chunks. You're creating a rack for your roast to sit on. Then salt and pepper all sides of the roast. It works best if you rub the salt and pepper into the meat. Just makes it stick better.
Then place the roast on top of the layer of onions in your pot. Take the remaining chunks of onion and lay them on top of the roast.
Put the lid on it. And cook for about three to four hours on high, and six to eight hours on low.
Wanna add some carrots and potatoes? Ok! That's easy too! Just peel and chop them and toss them into the crockpot on top of the roast. Add about 1/4 teaspoon of salt sprinkled onto each of the vegetables. Cook them as long as you're cooking the roast, or add them during the last two hours of cooking time. Either way, they'll be delish!
Sometimes, because I have so many in my family and we all LOVE our carrots, I just add the potatoes to the crockpot. And I roast the carrots in the oven as described in a previous post about side-dishes.
Just keep in mind...when you're cooking in the crockpot, it's not an exact science. Your cooking times can be different depending on the size of your roast, if it's still frozen, does it have more or less fat, or how many extra veggies you put in. Be prepared for these variances and leave yourself plenty of time.
And by all means...don't try to over season the roast! I'm a purist! You might possibly add a little garlic...but don't over do it. Keep that flavor real! I promise...you'll appreciate it!
First...I am horrible with breads. I can bake any kind of cake, cookie, or pie I set my mind to. But my bread always turns out like crackers. And unless you're desiring crackers...that's not a good thing! In the last couple of years, I've finally discovered the fine art of cornbread. Which is good...living here in the South.
I also stink at steak! Doesn't matter what kind, or if it's on the grill, stove or oven. I simply cannot make an awesome steak. My husband can. But don't let that get out...or he'll never let me live it down!
And last (for now!) I have never made a perfect pot roast. Ever. At least not anywhere but in my crockpot. I'm not a crockpot queen. I don't have a million recipes for it. But the one thing I know I can make successfully almost every single time...is a pot roast.
The ingredients are so simple, you'll think you're doing something wrong. My roast, like my steak, I like to keep a true beef flavor. Nothing fancy. No overwhelming flavors. I just use salt, pepper, and at least one whole onion. That's it!
Before starting, you need to make sure that your roast will actually fit into your crockpot. If not...your cook time is going to vary greatly. Experience has taught me this. If it's bigger than your crockpot, and thicker than you anticipated...you'll have to cook it much longer. I recently made this particular mistake...and my kiddos had frozen chicken nuggets with their deliciously roasted potatoes and carrots. Although, when the roast was done...it was PERFECT!
If your roast isn't defrosted. It's actually a-okay. Just start the cooking a little earlier, or just be prepared to eat a little later. A frozen roast will increase the liquid in your pot.
If you are going to cook your roast all day while you're at work, turn the heat on to low. If you want it done in just three or four hours, go ahead and start it on high.
Thickly chop your onion into chunks. You're creating a rack for your roast to sit on. Then salt and pepper all sides of the roast. It works best if you rub the salt and pepper into the meat. Just makes it stick better.
Then place the roast on top of the layer of onions in your pot. Take the remaining chunks of onion and lay them on top of the roast.
Put the lid on it. And cook for about three to four hours on high, and six to eight hours on low.
Wanna add some carrots and potatoes? Ok! That's easy too! Just peel and chop them and toss them into the crockpot on top of the roast. Add about 1/4 teaspoon of salt sprinkled onto each of the vegetables. Cook them as long as you're cooking the roast, or add them during the last two hours of cooking time. Either way, they'll be delish!
Sometimes, because I have so many in my family and we all LOVE our carrots, I just add the potatoes to the crockpot. And I roast the carrots in the oven as described in a previous post about side-dishes.
Just keep in mind...when you're cooking in the crockpot, it's not an exact science. Your cooking times can be different depending on the size of your roast, if it's still frozen, does it have more or less fat, or how many extra veggies you put in. Be prepared for these variances and leave yourself plenty of time.
And by all means...don't try to over season the roast! I'm a purist! You might possibly add a little garlic...but don't over do it. Keep that flavor real! I promise...you'll appreciate it!
Monday, May 5, 2014
Happy Cinco de Mayo!
It's Monday! And Cinco de Mayo! And while we really don't celebrate it as a family holiday, this is Texas...and quite frankly...it's celebrated pretty big here! So make an easy, light, Mexican themed dinner tonight!
Many years ago, my family lived in a small town. The only decent Mexican restaurant was Casa Ole. Really. I promise. But we loved it! And they made the best tortilla soup I've ever tasted. So over the years, we've experimented and played with the recipe until I feel like I've finally gotten a tortilla soup that I love just as much. And now we eat it at home regularly!
If you do this right, you can keep the recipe very low fat and low carb since it's all meat and vegetables. And where most Mexican restaurants use chicken in their soup, I prefer mine with beef.
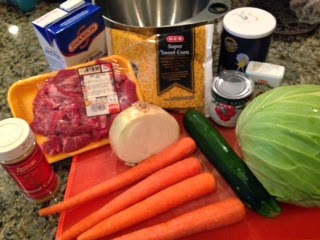
So here's the ingredients: pre-cut stew meat, beef stock, 4 or 5 carrots, 2 zucchini squash, 1/2 onion, cabbage, frozen corn, tomato sauce, salt, pepper, chili powder, and cumin.
First you'll finely chop the onion. I use a sweet yellow onion in almost all of my recipes. Toss these in the pot with either a tablespoon of butter or of vegetable oil. Let these saute on low heat while you prep the rest of the vegetables. You only want them to become translucent. Don't let them brown.
Now we're going to peel and slice the carrots. For a soup or stew, I like to slice them into very thin rounds. They go much further and cook faster this way. You'll want to put them into a large mixing bowl once they're sliced. Chop your zucchini squash. Cut both ends off, then slice it long ways twice. Now you'll slice these so that you have small quarter pieces. Place these into the mixing bowl on top of the carrots. Next you'll chop about a quarter of the head of cabbage. I like to have mine in squares. Just because it looks pretty! These pieces will go in the mixing bowl on top of the zucchini. Set this bowl aside until you're done with the meat.
Our next step is to chop the pre-cut stew meat. This accomplishes too things...first it will help the single package of meat to go much farther Second, it will cook much faster. Seeing a theme here? I like to stretch my dollars and cook quickly! The meat should be 1/4 inch squares and as soon as it's chopped, toss it in the pot with the onions and turn the heat up!
Let the meat brown on high heat, adding 1/2 teaspoon of salt and 1/4 teaspoon of pepper. You'll also add 1 1/2 tablespoons of ground cumin.
As soon as your meat is browned, add the cabbage and 1/4 teaspoon of salt. Stir the cabbage around with the meat until it starts getting a little clear around the edges. About a minute or two is all this should take. Then you'll add the zucchini squash and 1/4 teaspoon of salt. Do the same thing with this...stir it around with the meat to get that good beef flavor incorporated. The green of the cabbage and zucchini should be very bright right now.
Last vegetables to add are the carrots and frozen corn. I like a lot of corn in mine, so I use a full 12 ounce package. You can cut this down if you prefer. Don't forget to add 1/4 teaspoon of salt for each of these vegetables.
Now, it's time to add the beef broth. A 26 ounce carton of beef stock goes in. Then I fill the carton again with water to increase the liquid in the pot. You can use beef broth instead, it's just not quite as rich a flavor. The last two ingredients to add are one can of tomato sauce and 1 tablespoon of chili powder. This isn't a spicy soup, so don't use too much of the chili powder. But you can increase it a little if you want.
Bring the whole pot to a boil and cover it with a lid. Turn the heat to medium high so it's still bubbling, just not a heavy boil. Cook it for about 20 to 30 minutes, or until the carrots are soft. They're a good indicator of when the entire soup is finished.
Make sure you have a fresh bag of tortilla chips...that's what makes this "tortilla soup!" Dish up the soup and set out the chips. Then everyone can add their crushed tortilla chips to the soup and enjoy!
It's a very easy recipe, but the flavor is so rich and tasty! Everyone, from my Mother down to my three year old, will eat a second bowl. And the kiddos think it's fun getting to crush their chips to add for themselves.
Many years ago, my family lived in a small town. The only decent Mexican restaurant was Casa Ole. Really. I promise. But we loved it! And they made the best tortilla soup I've ever tasted. So over the years, we've experimented and played with the recipe until I feel like I've finally gotten a tortilla soup that I love just as much. And now we eat it at home regularly!
If you do this right, you can keep the recipe very low fat and low carb since it's all meat and vegetables. And where most Mexican restaurants use chicken in their soup, I prefer mine with beef.
So here's the ingredients: pre-cut stew meat, beef stock, 4 or 5 carrots, 2 zucchini squash, 1/2 onion, cabbage, frozen corn, tomato sauce, salt, pepper, chili powder, and cumin.
First you'll finely chop the onion. I use a sweet yellow onion in almost all of my recipes. Toss these in the pot with either a tablespoon of butter or of vegetable oil. Let these saute on low heat while you prep the rest of the vegetables. You only want them to become translucent. Don't let them brown.
Now we're going to peel and slice the carrots. For a soup or stew, I like to slice them into very thin rounds. They go much further and cook faster this way. You'll want to put them into a large mixing bowl once they're sliced. Chop your zucchini squash. Cut both ends off, then slice it long ways twice. Now you'll slice these so that you have small quarter pieces. Place these into the mixing bowl on top of the carrots. Next you'll chop about a quarter of the head of cabbage. I like to have mine in squares. Just because it looks pretty! These pieces will go in the mixing bowl on top of the zucchini. Set this bowl aside until you're done with the meat.
Our next step is to chop the pre-cut stew meat. This accomplishes too things...first it will help the single package of meat to go much farther Second, it will cook much faster. Seeing a theme here? I like to stretch my dollars and cook quickly! The meat should be 1/4 inch squares and as soon as it's chopped, toss it in the pot with the onions and turn the heat up!
Let the meat brown on high heat, adding 1/2 teaspoon of salt and 1/4 teaspoon of pepper. You'll also add 1 1/2 tablespoons of ground cumin.
As soon as your meat is browned, add the cabbage and 1/4 teaspoon of salt. Stir the cabbage around with the meat until it starts getting a little clear around the edges. About a minute or two is all this should take. Then you'll add the zucchini squash and 1/4 teaspoon of salt. Do the same thing with this...stir it around with the meat to get that good beef flavor incorporated. The green of the cabbage and zucchini should be very bright right now.
Last vegetables to add are the carrots and frozen corn. I like a lot of corn in mine, so I use a full 12 ounce package. You can cut this down if you prefer. Don't forget to add 1/4 teaspoon of salt for each of these vegetables.
Now, it's time to add the beef broth. A 26 ounce carton of beef stock goes in. Then I fill the carton again with water to increase the liquid in the pot. You can use beef broth instead, it's just not quite as rich a flavor. The last two ingredients to add are one can of tomato sauce and 1 tablespoon of chili powder. This isn't a spicy soup, so don't use too much of the chili powder. But you can increase it a little if you want.
Bring the whole pot to a boil and cover it with a lid. Turn the heat to medium high so it's still bubbling, just not a heavy boil. Cook it for about 20 to 30 minutes, or until the carrots are soft. They're a good indicator of when the entire soup is finished.
Make sure you have a fresh bag of tortilla chips...that's what makes this "tortilla soup!" Dish up the soup and set out the chips. Then everyone can add their crushed tortilla chips to the soup and enjoy!
It's a very easy recipe, but the flavor is so rich and tasty! Everyone, from my Mother down to my three year old, will eat a second bowl. And the kiddos think it's fun getting to crush their chips to add for themselves.
Monday, April 28, 2014
Don't Side-Step the Side-Dish part 2
With the complete craziness of my life right now, I slowed down a bit on my blogging. But I'm BACK!
So let's talk some more about side dishes and veggies! Not everything I make is a casserole or a mixed dish. Some nights, I'll cook up some pork chops (future blog!) or a little sausage and then focus more on the sides. Like the homemade mac-n-cheese I made for my mini-guest, I have quite a few pasta ideas (future blog!) and I love thinking up new ways to present my veggies.
One of my favorite vegetables of all time...CARROTS! I love carrots! I almost don't even care how you cook 'em...I could eat them all day long. But I don't...because then my skin would turn orange. Yuck!
As much as I love carrots, I also adore potatoes! Yes...My name is Stephanie...and I'm a carb-oholic. I can't get around it. I just love 'em.
One of my favorite ways to cook both the carrots and potatoes is roasting them. I've done some roasting of my veggies for a while. But last year, after doing a little research from different Super Chefs, I developed a little technique of my own. And I'm going to share it with you! Aren't you excited?
Your ingredients are very simple: Potatoes, carrots, olive oil, and kosher salt. That's it! Use however many potatoes and carrots that you'll need for your family. I typically do four or five potatoes and six or seven carrots for mine. I'd do more carrots with more time, just because these get eaten fast!
First...pre-heat your oven to 405 degrees. Not 400. Not 410. Just 405. Don't know why this worked best, but it did. Now prep your pans. You'll need two baking sheets. One for each. Line them with foil and then spray them with non-stick spray. They make it in olive oil flavored spray...so if you've got that use it. This will keep your flavors consistent. If you don't. Don't worry about it. Use what you've got!
Next you'll need two, gallon size freezer bags. Go ahead and have them open on your counter. Peel and chop your potatoes and toss them into one of the bags. Then peel and chop your carrots. I quarter mine and this helps them cook evenly.
Once you've got them both in their bags, add three tablespoons of olive oil and two tablespoons of kosher salt. Zip up those bags...and then shake, shake, shake! But make sure the pink and blue really do make purple on the zipper! Or your veggies are gonna go flying! As soon as it looks like they're all coated with the oil and salt, dump them out on their separate baking pans.
Slide the pans in the oven and let them cook for 45 to 55 minutes, depending on how hot your oven runs and how many you've put on each sheet.
As soon as their done, remove them from the oven and let them cool for just a few minutes. The foil will cool quickly so you can just lift those sheets and slide your veggies into their bowls.
I do have one word of warning...if your family enjoys carrots as much as mine...cook A LOT of carrots. I made these for our family Christmas dinner this year. I took them out of the oven and set them aside so that more dinner goodness could go into the oven and they were eaten like candy. Seriously! They were so delicious! There were no carrots left for dinner. But we sure did enjoy them as a snack.
So let's talk some more about side dishes and veggies! Not everything I make is a casserole or a mixed dish. Some nights, I'll cook up some pork chops (future blog!) or a little sausage and then focus more on the sides. Like the homemade mac-n-cheese I made for my mini-guest, I have quite a few pasta ideas (future blog!) and I love thinking up new ways to present my veggies.
One of my favorite vegetables of all time...CARROTS! I love carrots! I almost don't even care how you cook 'em...I could eat them all day long. But I don't...because then my skin would turn orange. Yuck!
As much as I love carrots, I also adore potatoes! Yes...My name is Stephanie...and I'm a carb-oholic. I can't get around it. I just love 'em.
One of my favorite ways to cook both the carrots and potatoes is roasting them. I've done some roasting of my veggies for a while. But last year, after doing a little research from different Super Chefs, I developed a little technique of my own. And I'm going to share it with you! Aren't you excited?
Your ingredients are very simple: Potatoes, carrots, olive oil, and kosher salt. That's it! Use however many potatoes and carrots that you'll need for your family. I typically do four or five potatoes and six or seven carrots for mine. I'd do more carrots with more time, just because these get eaten fast!
First...pre-heat your oven to 405 degrees. Not 400. Not 410. Just 405. Don't know why this worked best, but it did. Now prep your pans. You'll need two baking sheets. One for each. Line them with foil and then spray them with non-stick spray. They make it in olive oil flavored spray...so if you've got that use it. This will keep your flavors consistent. If you don't. Don't worry about it. Use what you've got!
Next you'll need two, gallon size freezer bags. Go ahead and have them open on your counter. Peel and chop your potatoes and toss them into one of the bags. Then peel and chop your carrots. I quarter mine and this helps them cook evenly.
Once you've got them both in their bags, add three tablespoons of olive oil and two tablespoons of kosher salt. Zip up those bags...and then shake, shake, shake! But make sure the pink and blue really do make purple on the zipper! Or your veggies are gonna go flying! As soon as it looks like they're all coated with the oil and salt, dump them out on their separate baking pans.
Slide the pans in the oven and let them cook for 45 to 55 minutes, depending on how hot your oven runs and how many you've put on each sheet.
As soon as their done, remove them from the oven and let them cool for just a few minutes. The foil will cool quickly so you can just lift those sheets and slide your veggies into their bowls.
I do have one word of warning...if your family enjoys carrots as much as mine...cook A LOT of carrots. I made these for our family Christmas dinner this year. I took them out of the oven and set them aside so that more dinner goodness could go into the oven and they were eaten like candy. Seriously! They were so delicious! There were no carrots left for dinner. But we sure did enjoy them as a snack.
Wednesday, April 9, 2014
Don't Side-Step the Side-Dish
A few weeks ago my cousin's little boy, Carter, came for a sleepover with my kiddos. A wild time was had by all! But this adorable little imp, makes me smile every time I see him! He's our little miracle baby, and to see the way he's growing up just makes me happy!
When we picked him up to bring him home with us, I told him "you can anything you want for dinner! What can I make for you?" He only wanted one thing...macaroni and cheese. That was it. I really tried to get him to commit to something else. I offered him spaghetti, meatloaf, fried rice, well...anything! But mac-n-cheese was it. And he was sticking to his guns. So macaroni and cheese is what I'd make! Anything for sweet Carter!
So often, though, we focus on our main dish and forget about the sides. Just remember...a side can be super simple and not take away from your main course, but it's an essential part of your total meal. Sometimes, I make wild and crazy sides. But usually they're easy and straightforward.
I decided for Carter's special dinner I'd actually focus on the side dish, and do easy for the rest. I had a ham steak in the fridge and some frozen broccoli...but the mac-n-cheese was all me!
For the macaroni and cheese I used 2 cups of heavy cream, 1 cup of butter, 1 package of elbow noodles, 8 to 12 ounces of shredded cheddar cheese, 1/2 teaspoon of salt, 1/8 teaspoon of black pepper (or less), and 1/8 teaspoon of nutmeg.
First, while the pasta is cooking, heat your heavy cream and butter in a sauce pan, just until the butter is melted. You don't want to boil it, so keep the fire low. I recommend using salted butter for this also, because if you don't, you'll find that you need to add salt. And that's just not necessary. Don't forget to salt your noodles while they cook! Pre-heat your oven to 350 degrees.
As soon as the butter is melted, add the salt, pepper, and nutmeg. I don't always put 1/8 teaspoon of the pepper, because it can overwhelm the flavor. But I do like at least a little, so try just a shake first. Now, start pouring in your shredded cheddar cheese, stirring as you add it. Most of the time, what I have in the house is actually Colby jack. But you can use whichever works for your family and taste. You can use as much cheese as you need, add more if for some reason your sauce looks too thin. Basically, you can't have too much cheese. Let this heat on low until it's smooth. Then after straining your pasta, add the creamy goodness to the pan with the elbow noodles and stir. You're almost done!
Pour this entire mixture into a 9 by 13 baking dish and sprinkle more cheese on top. Pop it into the oven and cook just until it bubbles and the cheese on top is perfectly melted.
I must admit...this particular meal didn't impress my kids. They'd rather have Kraft (insert forehead slap here). But Carter loved it! And all of us adults scarfed it down!
This is so easy, and you can vary it greatly to make just about any other creamy sauce for noodles. I use a combination of Italian white cheeses and fettuccine noodles to make fettuccine Alfredo. It's almost fool-proof!
I'll be doing a series on side-dishes. Let me know if there's something particular you'd like to hear about. Even if I've not made it...I'm game to try!
Monday, March 17, 2014
Irish eyes...
I wish I'd known before I left for my trip to Ireland, exactly how Irish I really was. Apparently, my great-grandfather was an Irish immigrant. Coming to America with his mother and sisters. When he was about ten years old, his mother was unable to care for him and his sisters so she left them at a Catholic orphanage.
If I'd known all of these details before I arrived on the Emerald Shores...I probably would've paid more attention to the tour guides! But alas! I did not have the knowledge. So I probably missed out on some prime opportunities to learn about our family. But never fear...I thoroughly enjoyed the meals on the trip! And the scenery was romantic and breathtaking!
There's a reason they call it the Emerald Isle. Ireland is beautifully, richly, green. It's as simple as that. It rained almost the entire week long. We just went anyway. As did the Irish locals.
From the time we landed at the Shannon airport until the time our plane departed from Dublin, my little tour group saw some of the most gorgeous scenery, ate rich meals, and tasted a pint of Guiness from one coast to the other. I learned two interesting things that I'll share with you now. One...Guiness is nasty! I'm sorry to say...but to me, it was like drinking the worst burned coffee. I pretended to sip every time I was offered a glass. But I just couldn't make myself drink it after the first taste. Yuck!
The second thing I learned...that the Irish LOVE their potatoes! Every single meal we ate contained potatoes...with a side of potatoes. Not fries, but boiled potatoes. And they set them on the table in a bowl like other restaraunts would serve bread. It's crazy! But as much as I love potatoes myself...it was perfect!
So today being St Patricks Day, I felt the pull of my Irish heritage. I need to make something Irish! And what could be more Irish than a hearty stew? Nothing! Just make sure you've got lots of potatoes!
A good stew is so simple to make and can really be done in under an hour. Although you'll find recipes that have much longer cooking times, it's not necessary. And the only thing different between my stew and one more likely to be found in Ireland, is the meat. I use beef, and they typically use lamb.
Gather a few ingredients: a package of stew meat, 6 or 7 potatoes, 4 large carrots, 1 1/2 cups of frozen corn, a can of green beans, a carton of beef stock (32oz), half an onion, salt, pepper, and a bay leaf.
It's always most time effecient to chop the veggies first. Toss the chopped onion into the pot with a tablespoon of butter (or vegetable oil) and saute until translucent. For my stew I like to slice the carrots into rounds. If you keep them pretty slim, it helps with the cooking time. But since this is a stew, you'll want to keep your potatoes a little more substantial.
The last thing I do, while the onions are cooking away over low heat, is chop the stew meat. Yes, I said chop the stew meat! I know! I know! It comes already chopped! But the pieces are very big. So I cut them into cubes about 1/4 inch each. It makes the package of meat go farther, and makes the bites smaller and easier to eat. And of course, it helps with the cooking time as well.
Once the onions are looking pretty, toss in the meat and turn up the heat. Brown the meat with 1/2 teaspoon of salt and about a 1/4 teaspoon of pepper. As soon as it's brown and smelling fabulous, add the potatoes and 1/2 teaspoon of salt. Then add the carrots, and a 1/2 teaspoon of salt. And then the frozen corn, and 1/2 teaspoon of salt. Last veggie...open the can of green beans and after draining the juice off...toss 'em in the pot. But DON'T add extra salt for them. I realize it sounds like we just added ALOT of salt. But potatoes take up alot of salt, so if you don't add plenty with each new vegetable, you won't get the flavor right.
Stir the pot after adding each ingredient. Then pour the 32oz carton of beef stock into the mix, stir, and toss a bayleaf on top. Cover the pot and let it boil for about 30 minutes, or until the potatoes are tender. Don't forget to pull out that bayleaf before you serve it. It's kinda yucky getting that in your bowl!
Serve up your amazing Irish stew and pretend you're in a pub in Kilkenny.
Need dessert? How about an Irish Cream Pie? Easier than the stew! You'll just need a package of instant chocolte pudding, Cool Whip, a graham cracker crust, milk, and some Baileys Irish Cream. This dessert is NOT for the little ones!
Make the pudding according to the directions on the box (the ones for a pie filling). I used a 1.4 ounce package, sugar free. The only variation will be to substitute the Baileys Irish Cream for 1/4 cup of the milk. Let the pudding set for just a few minutes to thicken, then add about 6 ounces of CoolWhip and stir. Mix it thoroughy and then pour this creamy dream into a 10 inch graham cracker crust. Top the pie with another 6 ounces of CoolWhip and then sprinkle some mini chocolate chips on top. Cover the pie and refrigerate until after dinner, at least an hour or two. That's it!
If I'd known all of these details before I arrived on the Emerald Shores...I probably would've paid more attention to the tour guides! But alas! I did not have the knowledge. So I probably missed out on some prime opportunities to learn about our family. But never fear...I thoroughly enjoyed the meals on the trip! And the scenery was romantic and breathtaking!
There's a reason they call it the Emerald Isle. Ireland is beautifully, richly, green. It's as simple as that. It rained almost the entire week long. We just went anyway. As did the Irish locals.
From the time we landed at the Shannon airport until the time our plane departed from Dublin, my little tour group saw some of the most gorgeous scenery, ate rich meals, and tasted a pint of Guiness from one coast to the other. I learned two interesting things that I'll share with you now. One...Guiness is nasty! I'm sorry to say...but to me, it was like drinking the worst burned coffee. I pretended to sip every time I was offered a glass. But I just couldn't make myself drink it after the first taste. Yuck!
The second thing I learned...that the Irish LOVE their potatoes! Every single meal we ate contained potatoes...with a side of potatoes. Not fries, but boiled potatoes. And they set them on the table in a bowl like other restaraunts would serve bread. It's crazy! But as much as I love potatoes myself...it was perfect!
So today being St Patricks Day, I felt the pull of my Irish heritage. I need to make something Irish! And what could be more Irish than a hearty stew? Nothing! Just make sure you've got lots of potatoes!
A good stew is so simple to make and can really be done in under an hour. Although you'll find recipes that have much longer cooking times, it's not necessary. And the only thing different between my stew and one more likely to be found in Ireland, is the meat. I use beef, and they typically use lamb.
Gather a few ingredients: a package of stew meat, 6 or 7 potatoes, 4 large carrots, 1 1/2 cups of frozen corn, a can of green beans, a carton of beef stock (32oz), half an onion, salt, pepper, and a bay leaf.
It's always most time effecient to chop the veggies first. Toss the chopped onion into the pot with a tablespoon of butter (or vegetable oil) and saute until translucent. For my stew I like to slice the carrots into rounds. If you keep them pretty slim, it helps with the cooking time. But since this is a stew, you'll want to keep your potatoes a little more substantial.
The last thing I do, while the onions are cooking away over low heat, is chop the stew meat. Yes, I said chop the stew meat! I know! I know! It comes already chopped! But the pieces are very big. So I cut them into cubes about 1/4 inch each. It makes the package of meat go farther, and makes the bites smaller and easier to eat. And of course, it helps with the cooking time as well.
Once the onions are looking pretty, toss in the meat and turn up the heat. Brown the meat with 1/2 teaspoon of salt and about a 1/4 teaspoon of pepper. As soon as it's brown and smelling fabulous, add the potatoes and 1/2 teaspoon of salt. Then add the carrots, and a 1/2 teaspoon of salt. And then the frozen corn, and 1/2 teaspoon of salt. Last veggie...open the can of green beans and after draining the juice off...toss 'em in the pot. But DON'T add extra salt for them. I realize it sounds like we just added ALOT of salt. But potatoes take up alot of salt, so if you don't add plenty with each new vegetable, you won't get the flavor right.
Stir the pot after adding each ingredient. Then pour the 32oz carton of beef stock into the mix, stir, and toss a bayleaf on top. Cover the pot and let it boil for about 30 minutes, or until the potatoes are tender. Don't forget to pull out that bayleaf before you serve it. It's kinda yucky getting that in your bowl!
Serve up your amazing Irish stew and pretend you're in a pub in Kilkenny.
Need dessert? How about an Irish Cream Pie? Easier than the stew! You'll just need a package of instant chocolte pudding, Cool Whip, a graham cracker crust, milk, and some Baileys Irish Cream. This dessert is NOT for the little ones!
Make the pudding according to the directions on the box (the ones for a pie filling). I used a 1.4 ounce package, sugar free. The only variation will be to substitute the Baileys Irish Cream for 1/4 cup of the milk. Let the pudding set for just a few minutes to thicken, then add about 6 ounces of CoolWhip and stir. Mix it thoroughy and then pour this creamy dream into a 10 inch graham cracker crust. Top the pie with another 6 ounces of CoolWhip and then sprinkle some mini chocolate chips on top. Cover the pie and refrigerate until after dinner, at least an hour or two. That's it!
Subscribe to:
Posts (Atom)