Tuesday, May 13, 2014

Is a Perfect Pot Roast Possible?

As with everything else in this world, it's always best when we food-lovin' cooks own up to our short-comings.  Come on!  You can do it!  Admit it!  There's something that you just can't master.  I'll start...I have a whole list.  Just don't tell anyone!  Ok?

First...I am horrible with breads.  I can bake any kind of cake, cookie, or pie I set my mind to.  But my bread always turns out like crackers.  And unless you're desiring crackers...that's not a good thing!  In the last couple of years, I've finally discovered the fine art of cornbread.  Which is good...living here in the South.

I also stink at steak!  Doesn't matter what kind, or if it's on the grill, stove or oven.  I simply cannot make an awesome steak.  My husband can.  But don't let that get out...or he'll never let me live it down!

And last (for now!) I have never made a perfect pot roast.  Ever.  At least not anywhere but in my crockpot.  I'm not a crockpot queen.  I don't have a million recipes for it.  But the one thing I know I can make successfully almost every single time...is a pot roast.

The ingredients are so simple, you'll think you're doing something wrong.  My roast, like my steak, I like to keep a true beef flavor.  Nothing fancy.  No overwhelming flavors.  I just use salt, pepper, and at least one whole onion.  That's it!

Before starting, you need to make sure that your roast will actually fit into your crockpot.  If not...your cook time is going to vary greatly.  Experience has taught me this.  If it's bigger than your crockpot, and thicker than you anticipated...you'll have to cook it much longer.  I recently made this particular mistake...and my kiddos had frozen chicken nuggets with their deliciously roasted potatoes and carrots.  Although, when the roast was done...it was PERFECT!

If your roast isn't defrosted.  It's actually a-okay.  Just start the cooking a little earlier, or just be prepared to eat a little later.  A frozen roast will increase the liquid in your pot.

If you are going to cook your roast all day while you're at work, turn the heat on to low.  If you want it done in just three or four hours, go ahead and start it on high.

Thickly chop your onion into chunks.  You're creating a rack for your roast to sit on.  Then salt and pepper all sides of the roast.  It works best if you rub the salt and pepper into the meat.  Just makes it stick better.

Then place the roast on top of the layer of onions in your pot.  Take the remaining chunks of onion and lay them on top of the roast.

Put the lid on it.  And cook for about three to four hours on high, and six to eight hours on low.

Wanna add some carrots and potatoes?  Ok!  That's easy too!  Just peel and chop them and toss them into the crockpot on top of the roast.  Add about 1/4 teaspoon of salt sprinkled onto each of the vegetables.  Cook them as long as you're cooking the roast, or add them during the last two hours of cooking time.  Either way, they'll be delish!

Sometimes, because I have so many in my family and we all LOVE our carrots, I just add the potatoes to the crockpot.  And I roast the carrots in the oven as described in a previous post about side-dishes.

Just keep in mind...when you're cooking in the crockpot, it's not an exact science.  Your cooking times can be different depending on the size of your roast, if it's still frozen, does it have more or less fat, or how many extra veggies you put in.  Be prepared for these variances and leave yourself plenty of time.


And by all means...don't try to over season the roast!  I'm a purist!  You might possibly add a little garlic...but don't over do it.  Keep that flavor real!  I promise...you'll appreciate it!

Monday, May 5, 2014

Happy Cinco de Mayo!

It's Monday!  And Cinco de Mayo!  And while we really don't celebrate it as a family holiday, this is Texas...and quite frankly...it's celebrated pretty big here!  So make an easy, light, Mexican themed dinner tonight!


Many years ago, my family lived in a small town.  The only decent Mexican restaurant was Casa Ole.  Really.  I promise.  But we loved it!  And they made the best tortilla soup I've ever tasted.  So over the years, we've experimented and played with the recipe until I feel like I've finally gotten a tortilla soup that I love just as much.  And now we eat it at home regularly!

If you do this right, you can keep the recipe very low fat and low carb since it's all meat and vegetables.  And where most Mexican restaurants use chicken in their soup, I prefer mine with beef.

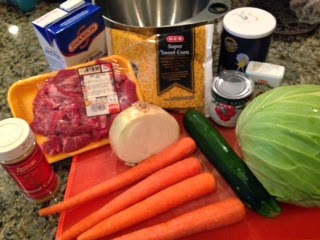
So here's the ingredients:  pre-cut stew meat, beef stock, 4 or 5 carrots, 2 zucchini squash, 1/2 onion, cabbage, frozen corn, tomato sauce, salt, pepper, chili powder, and cumin.

First you'll finely chop the onion.  I use a sweet yellow onion in almost all of my recipes.  Toss these in the pot with either a tablespoon of butter or of vegetable oil.  Let these saute on low heat while you prep the rest of the vegetables.  You only want them to become translucent.  Don't let them brown.

Now we're going to peel and slice the carrots.  For a soup or stew, I like to slice them into very thin rounds.  They go much further and cook faster this way.  You'll want to put them into a large mixing bowl once they're sliced.  Chop your zucchini squash.  Cut both ends off, then slice it long ways twice.  Now you'll slice these so that you have small quarter pieces.  Place these into the mixing bowl on top of the carrots.  Next you'll chop about a quarter of the head of cabbage.  I like to have mine in squares.  Just because it looks pretty!  These pieces will go in the mixing bowl on top of the zucchini.  Set this bowl aside until you're done with the meat.

Our next step is to chop the pre-cut stew meat.  This accomplishes too things...first it will help the single package of meat to go much farther  Second, it will cook much faster.  Seeing a theme here?  I like to stretch my dollars and cook quickly!  The meat should be 1/4 inch squares and as soon as it's chopped, toss it in the pot with the onions and turn the heat up!


Let the meat brown on high heat, adding 1/2 teaspoon of salt and 1/4 teaspoon of pepper.  You'll also add 1 1/2 tablespoons of ground cumin.  

As soon as your meat is browned, add the cabbage and 1/4 teaspoon of salt.  Stir the cabbage around with the meat until it starts getting a little clear around the edges.  About a minute or two is all this should take.  Then you'll add the zucchini squash and 1/4 teaspoon of salt. Do the same thing with this...stir it around with the meat to get that good beef flavor incorporated.  The green of the cabbage and zucchini should be very bright right now.


Last vegetables to add are the carrots and frozen corn.  I like a lot of corn in mine, so I use a full 12 ounce package.  You can cut this down if you prefer.  Don't forget to add 1/4 teaspoon of salt for each of these vegetables.

Now, it's time to add the beef broth.  A 26 ounce carton of beef stock goes in.  Then I fill the carton again with water to increase the liquid in the pot.  You can use beef broth instead, it's just not quite as rich a flavor.  The last two ingredients to add are one can of tomato sauce and 1 tablespoon of chili powder.  This isn't a spicy soup, so don't use too much of the chili powder.  But you can increase it a little if you want.

Bring the whole pot to a boil and cover it with a lid.  Turn the heat to medium high so it's still bubbling, just not a heavy boil.  Cook it for about 20 to 30 minutes, or until the carrots are soft.  They're a good indicator of when the entire soup is finished.

Make sure you have a fresh bag of tortilla chips...that's what makes this "tortilla soup!"  Dish up the soup and set out the chips.  Then everyone can add their crushed tortilla chips to the soup and enjoy!

It's a very easy recipe, but the flavor is so rich and tasty!  Everyone, from my Mother down to my three year old, will eat a second bowl.  And the kiddos think it's fun getting to crush their chips to add for themselves.

Monday, April 28, 2014

Don't Side-Step the Side-Dish part 2

With the complete craziness of my life right now, I slowed down a bit on my blogging.  But I'm BACK!

So let's talk some more about side dishes and veggies!  Not everything I make is a casserole or a mixed dish.  Some nights, I'll cook up some pork chops (future blog!) or a little sausage and then focus more on the sides.  Like the homemade mac-n-cheese I made for my mini-guest, I have quite a few pasta ideas (future blog!) and I love thinking up new ways to present my veggies.

One of my favorite vegetables of all time...CARROTS!  I love carrots!  I almost don't even care how you cook 'em...I could eat them all day long.  But I don't...because then my skin would turn orange. Yuck!

As much as I love carrots, I also adore potatoes!  Yes...My name is Stephanie...and I'm a carb-oholic.  I can't get around it.  I just love 'em.

One of my favorite ways to cook both the carrots and potatoes is roasting them.  I've done some roasting of my veggies for a while.  But last year, after doing a little research from different Super Chefs, I developed a little technique of my own.  And I'm going to share it with you!  Aren't you excited?

Your ingredients are very simple:  Potatoes, carrots, olive oil, and kosher salt.  That's it!  Use however many potatoes and carrots that you'll need for your family.  I typically do four or five potatoes and six or seven carrots for mine.  I'd do more carrots with more time, just because these get eaten fast!

First...pre-heat your oven to 405 degrees.  Not 400.  Not 410.  Just 405.  Don't know why this worked best, but it did.  Now prep your pans.  You'll need two baking sheets.  One for each.  Line them with foil and then spray them with non-stick spray.  They make it in olive oil flavored spray...so if you've got that use it.  This will keep your flavors consistent.  If you don't.  Don't worry about it.  Use what you've got!

Next you'll need two, gallon size freezer bags.  Go ahead and have them open on your counter.  Peel and chop your potatoes and toss them into one of the bags.  Then peel and chop your carrots.  I quarter mine and this helps them cook evenly.


Once you've got them both in their bags, add three tablespoons of olive oil and two tablespoons of kosher salt.  Zip up those bags...and then shake, shake, shake!  But make sure the pink and blue really do make purple on the zipper!  Or your veggies are gonna go flying!  As soon as it looks like they're all coated with the oil and salt, dump them out on their separate baking pans.

Slide the pans in the oven and let them cook for 45 to 55 minutes, depending on how hot your oven runs and how many you've put on each sheet.

As soon as their done, remove them from the oven and let them cool for just a few minutes.  The foil will cool quickly so you can just lift those sheets and slide your veggies into their bowls.

I do have one word of warning...if your family enjoys carrots as much as mine...cook A LOT of carrots.  I made these for our family Christmas dinner this year.  I took them out of the oven and set them aside so that more dinner goodness could go into the oven and they were eaten like candy.  Seriously!  They were so delicious!  There were no carrots left for dinner.  But we sure did enjoy them as a snack.

Wednesday, April 9, 2014

Don't Side-Step the Side-Dish

A few weeks ago my cousin's little boy, Carter, came for a sleepover with my kiddos.  A wild time was had by all!  But this adorable little imp, makes me smile every time I see him!  He's our little miracle baby, and to see the way he's growing up just makes me happy!  


When we picked him up to bring him home with us, I told him "you can anything you want for dinner!  What can I make for you?"  He only wanted one thing...macaroni and cheese.  That was it.  I really tried to get him to commit to something else.  I offered him spaghetti, meatloaf, fried rice, well...anything!  But mac-n-cheese was it.  And he was sticking to his guns.  So macaroni and cheese is what I'd make!  Anything for sweet Carter!


So often, though, we focus on our main dish and forget about the sides.  Just remember...a side can be super simple and not take away from your main course, but it's an essential part of your total meal.  Sometimes, I make wild and crazy sides.  But usually they're easy and straightforward.  

I decided for Carter's special dinner I'd actually focus on the side dish, and do easy for the rest.  I had a ham steak in the fridge and some frozen broccoli...but the mac-n-cheese was all me!  

For the macaroni and cheese I used 2 cups of heavy cream, 1 cup of butter, 1 package of elbow noodles, 8 to 12 ounces of shredded cheddar cheese, 1/2 teaspoon of salt, 1/8 teaspoon of black pepper (or less), and 1/8 teaspoon of nutmeg.

First, while the pasta is cooking, heat your heavy cream and butter in a sauce pan, just until the butter is melted.  You don't want to boil it, so keep the fire low.  I recommend using salted butter for this also, because if you don't, you'll find that you need to add salt.  And that's just not necessary.  Don't forget to salt your noodles while they cook! Pre-heat your oven to 350 degrees.


As soon as the butter is melted, add the salt, pepper, and nutmeg.  I don't always put 1/8 teaspoon of the pepper, because it can overwhelm the flavor.  But I do like at least a little, so try just a shake first.  Now, start pouring in your shredded cheddar cheese, stirring as you add it.  Most of the time, what I have in the house is actually Colby jack.  But you can use whichever works for your family and taste.  You can use as much cheese as you need, add more if for some reason your sauce looks too thin.  Basically, you can't have too much cheese.  Let this heat on low until it's smooth.  Then after straining your pasta, add the creamy goodness to the pan with the elbow noodles and stir.  You're almost done!

Pour this entire mixture into a 9 by 13 baking dish and sprinkle more cheese on top.  Pop it into the oven and cook just until it bubbles and the cheese on top is perfectly melted.  


I must admit...this particular meal didn't impress my kids.  They'd rather have Kraft (insert forehead slap here).  But Carter loved it! And all of us adults scarfed it down!  

This is so easy, and you can vary it greatly to make just about any other creamy sauce for noodles.  I use a combination of Italian white cheeses and fettuccine noodles to make fettuccine Alfredo.  It's almost fool-proof!

I'll be doing a series on side-dishes.  Let me know if there's something particular you'd like to hear about.  Even if I've not made it...I'm game to try!

Monday, March 17, 2014

Irish eyes...

I wish I'd known before I left for my trip to Ireland, exactly how Irish I really was.  Apparently, my great-grandfather was an Irish immigrant.  Coming to America with his mother and sisters.  When he was about ten years old, his mother was unable to care for him and his sisters so she left them at a Catholic orphanage.

If I'd known all of these details before I arrived on the Emerald Shores...I probably would've paid more attention to the tour guides!  But alas!  I did not have the knowledge.  So I probably missed out on some prime opportunities to learn about our family.  But never fear...I thoroughly enjoyed the meals on the trip!  And the scenery was romantic and breathtaking!


There's a reason they call it the Emerald Isle.  Ireland is beautifully, richly, green.  It's as simple as that.  It rained almost the entire week long.  We just went anyway.  As did the Irish locals.

From the time we landed at the Shannon airport until the time our plane departed from Dublin, my little tour group saw some of the most gorgeous scenery, ate rich meals, and tasted a pint of Guiness from one coast to the other.  I learned two interesting things that I'll share with you now.  One...Guiness is nasty!  I'm sorry to say...but to me, it was like drinking the worst burned coffee.  I pretended to sip every time I was offered a glass.  But I just couldn't make myself drink it after the first taste.  Yuck!


The second thing I learned...that the Irish LOVE their potatoes!  Every single meal we ate contained potatoes...with a side of potatoes.  Not fries, but boiled potatoes.  And they set them on the table in a bowl like other restaraunts would serve bread.  It's crazy!  But as much as I love potatoes myself...it was perfect!

So today being St Patricks Day, I felt the pull of my Irish heritage.  I need to make something Irish!  And what could be more Irish than a hearty stew?  Nothing!  Just make sure you've got lots of potatoes!

A good stew is so simple to make and can really be done in under an hour.  Although you'll find recipes that have much longer cooking times, it's not necessary.  And the only thing different between my stew and one more likely to be found in Ireland, is the meat.  I use beef, and they typically use lamb.

Gather a few ingredients: a package of stew meat, 6 or 7 potatoes, 4 large carrots, 1 1/2 cups of frozen corn, a can of green beans, a carton of beef stock (32oz), half an onion, salt, pepper, and a bay leaf.

It's always most time effecient to chop the veggies first.  Toss the chopped onion into the pot with a tablespoon of butter (or vegetable oil) and saute until translucent.  For my stew I like to slice the carrots into rounds.  If you keep them pretty slim, it helps with the cooking time.  But since this is a stew, you'll want to keep your potatoes a little more substantial.

The last thing I do, while the onions are cooking away over low heat, is chop the stew meat.  Yes, I said chop the stew meat!  I know!  I know!  It comes already chopped!  But the pieces are very big.  So I cut them into cubes about 1/4 inch each.  It makes the package of meat go farther, and makes the bites smaller and easier to eat.  And of course, it helps with the cooking time as well.

Once the onions are looking pretty, toss in the meat and turn up the heat. Brown the meat with 1/2 teaspoon of salt and about a 1/4 teaspoon of pepper.  As soon as it's brown and smelling fabulous, add the potatoes and 1/2 teaspoon of salt.  Then add the carrots, and a 1/2 teaspoon of salt.  And then the frozen corn, and 1/2 teaspoon of salt.  Last veggie...open the can of green beans and after draining the juice off...toss 'em in the pot.  But DON'T add extra salt for them.  I realize it sounds like we just added ALOT of salt.  But potatoes take up alot of salt, so if you don't add plenty with each new vegetable, you won't get the flavor right.


Stir the pot after adding each ingredient.  Then pour the 32oz carton of beef stock into the mix, stir, and toss a bayleaf on top.   Cover the pot and let it boil for about 30 minutes, or until the potatoes are tender.  Don't forget to pull out that bayleaf before you serve it.  It's kinda yucky getting that in your bowl!

Serve up your amazing Irish stew and pretend you're in a pub in Kilkenny.


Need dessert?  How about an Irish Cream Pie?  Easier than the stew!  You'll just need a package of instant chocolte pudding, Cool Whip, a graham cracker crust, milk, and some Baileys Irish Cream.  This dessert is NOT for the little ones!

Make the pudding according to the directions on the box (the ones for a pie filling).  I used a   1.4 ounce package, sugar free.  The only variation will be to substitute the Baileys Irish Cream for 1/4 cup of the milk.  Let the pudding set for just a few minutes to thicken, then add about 6 ounces of CoolWhip and stir.  Mix it thoroughy and then pour this creamy dream into a 10 inch graham cracker crust.  Top the pie with another 6 ounces of CoolWhip and then sprinkle some mini chocolate chips on top.  Cover the pie and refrigerate until after dinner, at least an hour or two.  That's it!

Wednesday, March 12, 2014

How Chinese should taste...

I recently returned from a quick cruise getaway with my sweetie.  The weather was perfect! Plenty of sunshine.  Lots of rest and relaxation.  And oh!  The FOOD!

If you've never cruised, you don't understand the 24 hour food orgy at all!  Eat breakfast in the dining room.  Then an hour later head on up to the buffet on the Lido deck and have second breakfast.  And then another hour later...make your way over to the 24 hour pizza station for a slice or two of the gourmet pizza! Well...then it's time for lunch!  And you start that process all over again.  Give yourself a couple of hours in the evening before you start on dinner.  And that's just so you can get dressed up (if you choose) to go to the dining room.

In the dining room, they'll place your napkin in your lap for you and put a leather bound menu in your hands.  Choose a "starter," an entree, or two of each.  There's no extra cost! And as soon as your meal is finished, your waiter will already be anticipating your desire for dessert and coffee.  The chocolate melting cake is my favorite on Carnival Cruise Line.  Some day....I'll learn to make it for myself!


There are plenty of spots to find good food.  And usually a very large variety.  The ship we were on last weekend, also had a little deli, a burger joint, and a Chinese "take-out."  No fear!  I tried it all!  And I LOVED...most of it.

I was so very disappointed in the Chinese "take-out."  It didn't satisfy my craving for Chinese food.  And it made my honey's tummy hurt.  It just wasn't good!  This made me sad.  But I assure you, I held back the tears.  Because the reality is...it's very hard to find good Chinese food anywhere near me anyway.

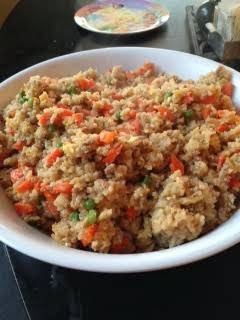
Having started the Chinese food craving while on the ship...I came home realizing that I was just going to have to take matters into my own hands.  So I made some pork fried rice. And EVERYONE was happy!

Over the last couple of years I've watched many TV chefs, researched online, and finally just experimented for myself and developed a recipe that beats the heck out of anything we've ever ordered...anywhere!

Chinese food doesn't have to be scary.  And as I mentioned in my Chinese New Year post, neither does the Chinese market.  You need to be sure what flavors you are really looking for, and don't be afraid to ask someone.  When you check out the "sauce aisle" you'll understand exactly how confusing it can be if you go unprepared.  I'm lucky enough to be married to a very handsome Chinese/Canadian that loves to cook.  So he guides me through it.

To make one recipe of fried rice, I use 2 cups of white rice (really any kind will do), about a pound of ground pork, 2 cups of chopped carrots,  cup of frozen petite peas, 1/2 cup of finely chopped onion, 3 eggs,  1 tablespoon of minced garlic, 1/3 cup of "light" soy sauce, 2 tablespoons of "dark"soy sauce, 1 tablespoon of sweet chili sauce, 1 tablespoon of butter, 1 tablespoon of vegetable oil, 1/2 teaspoon of salt, 1/4 teaspoon of black pepper, and that's all!

Go ahead and cook up your rice in advance.  If you can use day-old rice it's best, but if not don't worry.  Just use what you've got!  I honestly don't know how to make anything but "sticky" rice.  It doesn't phase my family at all!  Keep in mind, it takes about 30 minutes for your rice to cook.  So just don't leave it until last.

Now for the prep-work.  Finely chop those onions, and then peal and chop the carrots.  I REALLY like carrots.  So I always use at least 2 cups of chopped carrots.  Sometimes more.  But make sure you chop them pretty small so that they cook easier and faster.

Add 1 tablespoon of vegetable oil to your wok (or large skillet) and turn the heat on low.  As soon as your onions are chopped, add them to the already hot oil and let them sautee until they're translucent.  When they're ready, turn the heat up to high and add the tablespoon of minced garlic just before putting the ground pork into the wok.  Add 1/2 teaspoon of salt, 1/4 teaspoon of black pepper and stir this together and break it up very well.  I have a handy little tool that I got from Pampered Chef for just that purpose You'll need to brown it like you do ground beef, it just won't get as dark.


Once you can see that the pork is cooked through, add in the tablespoon of sweet chili sauce.  You can leave this step out if you'd rather.  I just like a little "zip" in my fried rice!  Sometimes...I even get adventurous and add TWO tablespoons of sweet chili sauce!  But that makes it a little more on the spicy side.

Stir in the chili sauce and add the chopped carrots.  Cook the pork and carrots for two or three minutes stirring often.  Then add the frozen (but defrosted!) peas to the mix.  Let this all cook together for about 5 to 7 minutes.  You don't want mushy carrots...but you do want to make sure they are good and cooked!


Now you're going to add the rice to the wok.  Go ahead!  Just dump it in!  It's almost fried rice!  Once it's in...stir it around and break up all of the clumps.

Doesn't look like fried rice yet?  The next steps will make that happen...and you'll be as amazed as I was the first time I made it.  Pour in 1/3 cup of "light" soy sauce and stir.  Try to make sure that all of the rice is covered.  It'll be a light brown color.  Then add 2 tablespoons of "dark" soy sauce.  This should bring it up to the pretty caramel color we're all used to.  There's just barely a difference between "light" and "dark" soy sauce.  Mostly it's in how they're processed.  And the flavor is only slightly different.  So if all you have is store-bought soy sauce...just use that instead, making it 1/3 cup and 2 tablespoons of the same soy sauce.

It should be starting to look familiar to you now!  Just one more step and we're ready to taste!  Turn the heat down to medium and take your spoon (I use a bamboo spoon on my non-stick pans) and make a "well" in the center of your rice.  Drop the tablespoon of butter (or use vegetable oil if you can't use butter) into the center of that well.  Break your three eggs into a small bowl and scramble them up with either a fork or a wisk.  Now pour the eggs down into that well and let it sit for a minute or so.  As soon as you see the eggs start cooking on the bottom of the pan, begin slowly incorporating the rice down into the eggs.  Then just stir it all up.  You should start seeing "chunks" of scrambled egg throughout.


Now does it look like fried rice?  It should!  Because as soon as you see that all of the egg is thoroughly cooked, you're done!  Grab a tasting spoon and take a bite!  Be careful!  It's hot!

Pour the whole pan of pork fried rice into a nice serving dish and put it on the table.  This usually feeds my whole family of 7 with a bit of leftovers.  Be prepared for compliments galore!  Need a dish to take to a potluck?  This one travels well!


One quick note...unlike my other dishes that include multiple vegetables in them, do NOT add extra salt for each ingredient!  Just salt the pork and the rice...and let the soy sauce do it's thing!  It'll be way too salty if you add to the carrots and peas.

When you're done eating this amazing dish...call my favorite travel agent (my sweetie!) and book yourself on a cruise!

Thursday, March 6, 2014

Comfort food...yes!

What could possibly taste better than shepherds pie?  In an English pub?  With a view of the outer walls of Windsor Castle?  Well...not much!  But I have learned to make a variation of this dish that I enjoyed all those years ago with my mother and sister sitting in that pub in Windsor.  Aaaaahhhh...it was a dream come true...and so was the trip!

I make a lot of dishes using ground beef.  But let's face it...it's cheap!  And when you have this many mouths to feed, you can stretch a pound of ground beef pretty far.  Especially in casserole type dishes.  And shepherds pie is one of my family's favorites.  It's fresh, full of veggies, and very comforting.

I use just one pound of ground beef for this recipe, and it makes a full pan.  So it feeds a lot!  You'll also need 4 packages of instant mashed potatoes, two jars of gravy, four good sized carrots, a bag of frozen corn, a can of green beans, Worchestershire sauce, garlic, a quarter of an onion, salt, and pepper, and about 1/2 a cup of shredded cheddar cheese.

Before you get started, the only prep-work you'll need to do is to chop the onion, and peal and chop the carrots.  Chop them small, so that they'll cook faster.  Not crazy about super crunchy carrots in my pie.

As with all of my recipes, I start by sauteing the onions with a tablespoon of butter, on low heat, until they're translucent.  Then add the ground beef to the skillet along with 1/2 teaspoon of salt, and 1/4 teaspoon of black pepper and turn the fire to high.  Next add a tablespoon of Worchestershire sauce and stir the meat.  Break it up finely and cook it until it's good and brown.


As soon as the meat is browned, add the carrots, corn, and green beans to the pan.  You'll need to make sure you add at least 1/4 teaspoon of salt for each new ingredient.  Stir these around with the meat and then add the jars of gravy.  I use one beef gravy and one mushroom gravy.  Both are beef based.  You could make your own gravy...but why?  This is so much faster and easier!

Stir this all really well and cover the pan.  You want this to cook for about 10 to 15 minutes.  Now you need to heat your oven to 350 and start making your mashed potatoes according to the instructions on the package.

Once your mixture has cooked for a while, pour it into a 9 by 13 baking pan.  Cover the pie with your mashed potatoes, completely.  Then sprinkle the shredded cheese on top.


Pop the whole thing in the oven and cook until the cheese is melted and the pie is bubbling around the edges.

Take it out...and serve it hot!  I promise...it'll be eaten...fast!  Then close your eyes...and imagine a pub in England...