Monday, March 17, 2014

Irish eyes...

I wish I'd known before I left for my trip to Ireland, exactly how Irish I really was.  Apparently, my great-grandfather was an Irish immigrant.  Coming to America with his mother and sisters.  When he was about ten years old, his mother was unable to care for him and his sisters so she left them at a Catholic orphanage.

If I'd known all of these details before I arrived on the Emerald Shores...I probably would've paid more attention to the tour guides!  But alas!  I did not have the knowledge.  So I probably missed out on some prime opportunities to learn about our family.  But never fear...I thoroughly enjoyed the meals on the trip!  And the scenery was romantic and breathtaking!


There's a reason they call it the Emerald Isle.  Ireland is beautifully, richly, green.  It's as simple as that.  It rained almost the entire week long.  We just went anyway.  As did the Irish locals.

From the time we landed at the Shannon airport until the time our plane departed from Dublin, my little tour group saw some of the most gorgeous scenery, ate rich meals, and tasted a pint of Guiness from one coast to the other.  I learned two interesting things that I'll share with you now.  One...Guiness is nasty!  I'm sorry to say...but to me, it was like drinking the worst burned coffee.  I pretended to sip every time I was offered a glass.  But I just couldn't make myself drink it after the first taste.  Yuck!


The second thing I learned...that the Irish LOVE their potatoes!  Every single meal we ate contained potatoes...with a side of potatoes.  Not fries, but boiled potatoes.  And they set them on the table in a bowl like other restaraunts would serve bread.  It's crazy!  But as much as I love potatoes myself...it was perfect!

So today being St Patricks Day, I felt the pull of my Irish heritage.  I need to make something Irish!  And what could be more Irish than a hearty stew?  Nothing!  Just make sure you've got lots of potatoes!

A good stew is so simple to make and can really be done in under an hour.  Although you'll find recipes that have much longer cooking times, it's not necessary.  And the only thing different between my stew and one more likely to be found in Ireland, is the meat.  I use beef, and they typically use lamb.

Gather a few ingredients: a package of stew meat, 6 or 7 potatoes, 4 large carrots, 1 1/2 cups of frozen corn, a can of green beans, a carton of beef stock (32oz), half an onion, salt, pepper, and a bay leaf.

It's always most time effecient to chop the veggies first.  Toss the chopped onion into the pot with a tablespoon of butter (or vegetable oil) and saute until translucent.  For my stew I like to slice the carrots into rounds.  If you keep them pretty slim, it helps with the cooking time.  But since this is a stew, you'll want to keep your potatoes a little more substantial.

The last thing I do, while the onions are cooking away over low heat, is chop the stew meat.  Yes, I said chop the stew meat!  I know!  I know!  It comes already chopped!  But the pieces are very big.  So I cut them into cubes about 1/4 inch each.  It makes the package of meat go farther, and makes the bites smaller and easier to eat.  And of course, it helps with the cooking time as well.

Once the onions are looking pretty, toss in the meat and turn up the heat. Brown the meat with 1/2 teaspoon of salt and about a 1/4 teaspoon of pepper.  As soon as it's brown and smelling fabulous, add the potatoes and 1/2 teaspoon of salt.  Then add the carrots, and a 1/2 teaspoon of salt.  And then the frozen corn, and 1/2 teaspoon of salt.  Last veggie...open the can of green beans and after draining the juice off...toss 'em in the pot.  But DON'T add extra salt for them.  I realize it sounds like we just added ALOT of salt.  But potatoes take up alot of salt, so if you don't add plenty with each new vegetable, you won't get the flavor right.


Stir the pot after adding each ingredient.  Then pour the 32oz carton of beef stock into the mix, stir, and toss a bayleaf on top.   Cover the pot and let it boil for about 30 minutes, or until the potatoes are tender.  Don't forget to pull out that bayleaf before you serve it.  It's kinda yucky getting that in your bowl!

Serve up your amazing Irish stew and pretend you're in a pub in Kilkenny.


Need dessert?  How about an Irish Cream Pie?  Easier than the stew!  You'll just need a package of instant chocolte pudding, Cool Whip, a graham cracker crust, milk, and some Baileys Irish Cream.  This dessert is NOT for the little ones!

Make the pudding according to the directions on the box (the ones for a pie filling).  I used a   1.4 ounce package, sugar free.  The only variation will be to substitute the Baileys Irish Cream for 1/4 cup of the milk.  Let the pudding set for just a few minutes to thicken, then add about 6 ounces of CoolWhip and stir.  Mix it thoroughy and then pour this creamy dream into a 10 inch graham cracker crust.  Top the pie with another 6 ounces of CoolWhip and then sprinkle some mini chocolate chips on top.  Cover the pie and refrigerate until after dinner, at least an hour or two.  That's it!

Wednesday, March 12, 2014

How Chinese should taste...

I recently returned from a quick cruise getaway with my sweetie.  The weather was perfect! Plenty of sunshine.  Lots of rest and relaxation.  And oh!  The FOOD!

If you've never cruised, you don't understand the 24 hour food orgy at all!  Eat breakfast in the dining room.  Then an hour later head on up to the buffet on the Lido deck and have second breakfast.  And then another hour later...make your way over to the 24 hour pizza station for a slice or two of the gourmet pizza! Well...then it's time for lunch!  And you start that process all over again.  Give yourself a couple of hours in the evening before you start on dinner.  And that's just so you can get dressed up (if you choose) to go to the dining room.

In the dining room, they'll place your napkin in your lap for you and put a leather bound menu in your hands.  Choose a "starter," an entree, or two of each.  There's no extra cost! And as soon as your meal is finished, your waiter will already be anticipating your desire for dessert and coffee.  The chocolate melting cake is my favorite on Carnival Cruise Line.  Some day....I'll learn to make it for myself!


There are plenty of spots to find good food.  And usually a very large variety.  The ship we were on last weekend, also had a little deli, a burger joint, and a Chinese "take-out."  No fear!  I tried it all!  And I LOVED...most of it.

I was so very disappointed in the Chinese "take-out."  It didn't satisfy my craving for Chinese food.  And it made my honey's tummy hurt.  It just wasn't good!  This made me sad.  But I assure you, I held back the tears.  Because the reality is...it's very hard to find good Chinese food anywhere near me anyway.

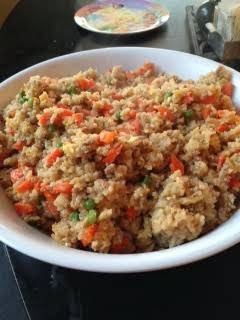
Having started the Chinese food craving while on the ship...I came home realizing that I was just going to have to take matters into my own hands.  So I made some pork fried rice. And EVERYONE was happy!

Over the last couple of years I've watched many TV chefs, researched online, and finally just experimented for myself and developed a recipe that beats the heck out of anything we've ever ordered...anywhere!

Chinese food doesn't have to be scary.  And as I mentioned in my Chinese New Year post, neither does the Chinese market.  You need to be sure what flavors you are really looking for, and don't be afraid to ask someone.  When you check out the "sauce aisle" you'll understand exactly how confusing it can be if you go unprepared.  I'm lucky enough to be married to a very handsome Chinese/Canadian that loves to cook.  So he guides me through it.

To make one recipe of fried rice, I use 2 cups of white rice (really any kind will do), about a pound of ground pork, 2 cups of chopped carrots,  cup of frozen petite peas, 1/2 cup of finely chopped onion, 3 eggs,  1 tablespoon of minced garlic, 1/3 cup of "light" soy sauce, 2 tablespoons of "dark"soy sauce, 1 tablespoon of sweet chili sauce, 1 tablespoon of butter, 1 tablespoon of vegetable oil, 1/2 teaspoon of salt, 1/4 teaspoon of black pepper, and that's all!

Go ahead and cook up your rice in advance.  If you can use day-old rice it's best, but if not don't worry.  Just use what you've got!  I honestly don't know how to make anything but "sticky" rice.  It doesn't phase my family at all!  Keep in mind, it takes about 30 minutes for your rice to cook.  So just don't leave it until last.

Now for the prep-work.  Finely chop those onions, and then peal and chop the carrots.  I REALLY like carrots.  So I always use at least 2 cups of chopped carrots.  Sometimes more.  But make sure you chop them pretty small so that they cook easier and faster.

Add 1 tablespoon of vegetable oil to your wok (or large skillet) and turn the heat on low.  As soon as your onions are chopped, add them to the already hot oil and let them sautee until they're translucent.  When they're ready, turn the heat up to high and add the tablespoon of minced garlic just before putting the ground pork into the wok.  Add 1/2 teaspoon of salt, 1/4 teaspoon of black pepper and stir this together and break it up very well.  I have a handy little tool that I got from Pampered Chef for just that purpose You'll need to brown it like you do ground beef, it just won't get as dark.


Once you can see that the pork is cooked through, add in the tablespoon of sweet chili sauce.  You can leave this step out if you'd rather.  I just like a little "zip" in my fried rice!  Sometimes...I even get adventurous and add TWO tablespoons of sweet chili sauce!  But that makes it a little more on the spicy side.

Stir in the chili sauce and add the chopped carrots.  Cook the pork and carrots for two or three minutes stirring often.  Then add the frozen (but defrosted!) peas to the mix.  Let this all cook together for about 5 to 7 minutes.  You don't want mushy carrots...but you do want to make sure they are good and cooked!


Now you're going to add the rice to the wok.  Go ahead!  Just dump it in!  It's almost fried rice!  Once it's in...stir it around and break up all of the clumps.

Doesn't look like fried rice yet?  The next steps will make that happen...and you'll be as amazed as I was the first time I made it.  Pour in 1/3 cup of "light" soy sauce and stir.  Try to make sure that all of the rice is covered.  It'll be a light brown color.  Then add 2 tablespoons of "dark" soy sauce.  This should bring it up to the pretty caramel color we're all used to.  There's just barely a difference between "light" and "dark" soy sauce.  Mostly it's in how they're processed.  And the flavor is only slightly different.  So if all you have is store-bought soy sauce...just use that instead, making it 1/3 cup and 2 tablespoons of the same soy sauce.

It should be starting to look familiar to you now!  Just one more step and we're ready to taste!  Turn the heat down to medium and take your spoon (I use a bamboo spoon on my non-stick pans) and make a "well" in the center of your rice.  Drop the tablespoon of butter (or use vegetable oil if you can't use butter) into the center of that well.  Break your three eggs into a small bowl and scramble them up with either a fork or a wisk.  Now pour the eggs down into that well and let it sit for a minute or so.  As soon as you see the eggs start cooking on the bottom of the pan, begin slowly incorporating the rice down into the eggs.  Then just stir it all up.  You should start seeing "chunks" of scrambled egg throughout.


Now does it look like fried rice?  It should!  Because as soon as you see that all of the egg is thoroughly cooked, you're done!  Grab a tasting spoon and take a bite!  Be careful!  It's hot!

Pour the whole pan of pork fried rice into a nice serving dish and put it on the table.  This usually feeds my whole family of 7 with a bit of leftovers.  Be prepared for compliments galore!  Need a dish to take to a potluck?  This one travels well!


One quick note...unlike my other dishes that include multiple vegetables in them, do NOT add extra salt for each ingredient!  Just salt the pork and the rice...and let the soy sauce do it's thing!  It'll be way too salty if you add to the carrots and peas.

When you're done eating this amazing dish...call my favorite travel agent (my sweetie!) and book yourself on a cruise!

Thursday, March 6, 2014

Comfort food...yes!

What could possibly taste better than shepherds pie?  In an English pub?  With a view of the outer walls of Windsor Castle?  Well...not much!  But I have learned to make a variation of this dish that I enjoyed all those years ago with my mother and sister sitting in that pub in Windsor.  Aaaaahhhh...it was a dream come true...and so was the trip!

I make a lot of dishes using ground beef.  But let's face it...it's cheap!  And when you have this many mouths to feed, you can stretch a pound of ground beef pretty far.  Especially in casserole type dishes.  And shepherds pie is one of my family's favorites.  It's fresh, full of veggies, and very comforting.

I use just one pound of ground beef for this recipe, and it makes a full pan.  So it feeds a lot!  You'll also need 4 packages of instant mashed potatoes, two jars of gravy, four good sized carrots, a bag of frozen corn, a can of green beans, Worchestershire sauce, garlic, a quarter of an onion, salt, and pepper, and about 1/2 a cup of shredded cheddar cheese.

Before you get started, the only prep-work you'll need to do is to chop the onion, and peal and chop the carrots.  Chop them small, so that they'll cook faster.  Not crazy about super crunchy carrots in my pie.

As with all of my recipes, I start by sauteing the onions with a tablespoon of butter, on low heat, until they're translucent.  Then add the ground beef to the skillet along with 1/2 teaspoon of salt, and 1/4 teaspoon of black pepper and turn the fire to high.  Next add a tablespoon of Worchestershire sauce and stir the meat.  Break it up finely and cook it until it's good and brown.


As soon as the meat is browned, add the carrots, corn, and green beans to the pan.  You'll need to make sure you add at least 1/4 teaspoon of salt for each new ingredient.  Stir these around with the meat and then add the jars of gravy.  I use one beef gravy and one mushroom gravy.  Both are beef based.  You could make your own gravy...but why?  This is so much faster and easier!

Stir this all really well and cover the pan.  You want this to cook for about 10 to 15 minutes.  Now you need to heat your oven to 350 and start making your mashed potatoes according to the instructions on the package.

Once your mixture has cooked for a while, pour it into a 9 by 13 baking pan.  Cover the pie with your mashed potatoes, completely.  Then sprinkle the shredded cheese on top.


Pop the whole thing in the oven and cook until the cheese is melted and the pie is bubbling around the edges.

Take it out...and serve it hot!  I promise...it'll be eaten...fast!  Then close your eyes...and imagine a pub in England...


Wednesday, February 26, 2014

Cooking together...a contact sport!

Gary and I LOVE to cook together.  We enjoy our time in the kitchen.  And our meals made together almost always turn out amazing!  But to the casual observer...you'd think it was World War III going down when we start our prep work.  We bicker. We fight.  We argue over everything.  And then we eat.  It's a special dance we have.  And oddly enough, we end up hashing out things that we never intended to discuss.  Our own brand of couples therapy.  But it's not for the weak!

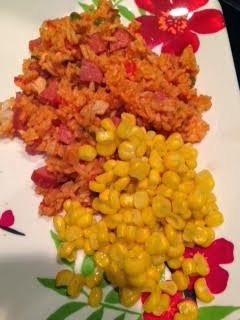
My sweet husband took a day off this past Monday.  And we decided to make his fabulous "spicy rice" dish.  It's really close to a jambalaya, but not totally Cajun.  My family loves this dish, spice and all!  Even the baby cleans his plate.

I am normally very careful to create meals that my diabetic family members can handle.  Low-carb pasta, potatoes...that sort of thing.  But this is not in that genre.  Not even close.  Rice tends to be much more difficult for them to process, so be prepared if that's an issue.  You could probably use brown rice if you just wanted to be healthy.  But we like to live on the edge occasionally.

For this dish we use both chicken breasts and sausage.  Two good sized chicken breasts, chopped should equal about 2 cups.  I prefer to use Eckrich "skinless" sausage.  Because we add so many spices to the mix, you don't need your sausage to be spicy.  And the skinless just makes it easier to eat.  We use both links, sliced thick and then quartered.


The rest of our ingredients are fairly simple.  And I'll include amounts.  But I suggest you experiment and get the flavor right for you and your family.  The heat can get pretty intense.
You'll need 1/4 sweet, yellow onion; 1 red bell pepper; 1 green bell pepper; 2 cans of tomato sauce; Sriracha sauce; 1 tablespoon of minced garlic;  1/2 teaspoon of salt for the meat and 1/2 teaspoon salt for the rice; 1/4 teaspoon of black pepper; 1/2 teaspoon of Louisiana brand Cajun Seasoning; 1/2 teaspoon Mrs. Dash "Extra Spicy";  Cayenne pepper; chili powder; 1 tablespoon of sweet chili sauce;  2 cups of rice.  And that's it!

Now, if you can't find these brands of spices...here's what's in them so you can match it up:

Louisiana brand Cajun Seasoning - Salt, spices, red pepper, garlic, and paprika.  (yes...a little vague on the "spices" but look for Cajun and you'll be alright!)

Mrs. Dash "Extra Spicy" - Black pepper, sweet chili pepper, cayenne pepper, celery seed, oregano, cumin, basil, bay, marjoram, savory, thyme, coriander, mustard, rosemary, onion, garlic, tomato, paprika color, citric acid, orange peel, oil of lemon.

Let's start cooking...get your boxing gloves on!

You'll want to start your rice cooking first.  I cheat...I use the fabulous rice cooker that my husband bought me a few years ago. Best gift ever!  A good pot of rice can take about 30 minutes to cook so get it started first.  Rule of thumb for rice...1 cup of rice to 2 cups of water.  And don't forget to salt it before it cooks!  Just a half teaspoon of salt is all the flavor it needs!

Now that your rice is on, get started on the prep work.  Because every kitchen has limited counter space, and I'm sure that no one has a separate cutting board for every item, I recommend starting with the veggies.  Finely chop your onion, and both bell peppers.  Well...at least that's what my husband does!  When I'm doing the chopping, it's a little bigger...so I can pick these out while I'm eating!  I love the flavor of cooking with the peppers, I just don't care to eat them.  These should come to about  cup of each, however you choose to chop them.


Rinse your board, then chop up the sausage.  If you use both links, it should yield about 3 cups of meat.  Then rinse one more time and chop up the chicken breasts.  If they aren't fully defrosted...don't worry.  It's actually a little easier to chop chicken when it's still a little stiff.

Once you've got everything chopped, add about 3 tablespoons of vegetable oil to your skillet and turn the fire to high heat.  Next add one tablespoon of minced garlic to the pan and stir it around for just a minute, infusing the oil with your garlic flavor.  Toss your chicken and onions both into your hot skillet.  Add the 1/2 teaspoon of salt and 1/4 teaspoon of pepper and stir.

NOW...you're gonna light the REAL fire!

Stir in 1 tablespoon of sweet chili sauce.  1/4 teaspoon of Sriracha sauce goes in next. Time to add the dried spices - 1/4 teaspoon of ground cayenne pepper, 1/4 teaspoon of Mrs. Dash "Extra Spicy," 1/4 teaspoon of Cajun Seasoning, 1/2 teaspoon of chili powder and stir!


Add in you 1 cup of green bell peppers and your red bell peppers and stir again.  Now...play with your spices.  Sprinkle a little of each in again and after adding the sausage, cook this mixture until the liquid is all gone.  Feel free to keep spicing it up...if you dare!


As soon as you've cooked off all of the liquid in the pan, you'll add the two cans of tomato sauce.  Now, adding the sauce will take some of your heat out...so zap in whichever of the flavors is your favorite.  Just a dash...or it'll be overwhelming!  Turn your fire down to low and let it simmer for about 5 to 10 minutes.  Get those flavors good and married.

Something to keep in mind about "spicy cooking:" The longer it sits...the spicier it gets!  Don't forget this rule while you're adding those spices in.

At this point, your rice should already be done and ready to add to the skillet.  Make sure you mix very well once it's in the pan so that all of your rice is coated with the sauce.  Keep the fire on low and let it cook for just a few minutes more.  You want to serve this sticky, not juicy.

Your dish is officially ready now...put it into a pretty serving dish and set it on the table.  I like to serve mine with a side of buttered corn.  This keeps the fire in my mouth down while I enjoy much more of the rice than I should be eating!

Before you start cooking this with your spouse...check two things first...take your Prilosec!  And maybe make a list of topics that are off limits ;).

Go Spicy!

Wednesday, February 19, 2014

Once Upon A Time..Lasagna!

Once upon a time, there was a girl.  Well, not really a girl.  She was actually kinda old to be called a girl.  More like a "30-something." She found herself going on a dream trip.  A trans-Atlantic crossing, on the Queen Mary 2.  This was a dream trip because it was number 2 on her "bucket list."  Everyone has one of those don't they?

The ship was scheduled to sail from New York Harbour, past the Statue of Liberty, on October 24, 2006.  As she made her preparations to go on this trip, she imagined all sorts of romantic things.  And she laughed to her friends, "I'm going to have a ship-board romance!"  Knowing full well that she was much too shy to actually have one.  But it was fun to dream.

The "girl" and her travel companion, her adventure loving mother, left for New York City early that fall morning.  They boarded the QM2 with starry eyes and full of excitement.  That very night at a cocktail party for her and the other travel agents on board, she met her shipboard romance!  When she and her mother walked into the lounge, her mother's whispered "Look at that cute Chinese guy over there," sealed her fate.


Six days later, after disembarking in Southampton England, she was totally smitten and looking forward to meeting up with him again in London.  After having dinner with him, her mother, and her sister in London, they all headed home.  The "girl" and her family to Houston.  He back to Vancouver.  And the long-distance romance began in earnest.

He made arrangements to visit Houston almost as soon as he arrived home.  And on his first trip down...she cooked him lasagna!

My husband swears, to this day, that my lasagna is the reason he proposed.  Or maybe it was my apple pie...but most likely...it was the lasagna!

My Mammaw always made her lasagna from scratch.  And while it's not the fastest meal to cook, it's not anywhere near as complicated as most people think.  And it can actually be made a day or two ahead if that would be simpler.

I recently had a house full of unexpected company coming for dinner.  I had about 2 1/2 hours before they'd arrive and I needed to feed about 15 people.  Amazingly enough, I had most of the ingredients required to make my lasagna.  I jumped in the car and ran to HEB to grab a little more cheese...and I started to work.

The recipe is very simple.  And it's very similar to my spaghetti sauce, which I'll share at a later time.  For this many people, I used 2 pounds of ground beef.  3 tablespoons of olive oil, 3 tablespoons of dried Italian seasonings, one whole sweet yellow onion, 3 tablespoons of minced garlic, 1 teaspoon of salt, 1/2 teaspoon of black pepper, 2 - 14.5 ounce cans of diced tomatoes with Italian seasonings, 2 - 6 ounce cans of tomato paste with basil/garlic/and oregano, 54 ounces of tomato sauce, 18 lasagna noodles (yes...I actually count them out!), 2 - 8 ounce packages of shredded Italian Five Cheese from Kraft, 24 ounces of shredded mozzerella, approximately 32 ounces of cottage cheese, and one egg.


To start (and be prepared...your kitchen will begin to smell like an Italian restaurant very quickly!) pour the 3 tablespoons of olive oil into your pot and turn the heat on low.  Then add in the 3 tablespoons of dried Italian seasonings.  You can use fresh if you'd prefer.  But I don't typically have the time or energy to keep up with fresh herbs.  And while feeling a little guilty over it, I watched an episode of The Barefoot Contessa.  She had a professional chef on.  He said the key to using dried herbs is making sure to fully re-hydrate them.  Thank you Ina and friend!  You just made my life so much easier, and completely eliminated my guilt!

So now I use this technique every time.  I add the dried herbs to the olive oil before I even begin to sautee the onions.  Which is the very next step.  I find that the time it takes me to chop the onion is all the extra time the herbs need to soak up the oil.  So now I add the onions to the pot and let them cook until translucent.  The last thing I do, just before adding the meat to the pot, is add the 3 tablespoons of minced garlic.  You can use fresh garlic, but  in the interest of expediency, I use jar.  I honestly can't tell the difference in a dish like this.

After I put the ground beef into the pot(adding 1 teaspoon of salt and 1/2 teaspoon of black pepper), I turn the heat up to high and pour in the two cans of diced tomatoes.  I use the kind already seasoned, it just can't hurt to have more seasoning! Cook this until the meat is good and brown and make sure you get the consistency very fine.  For me...I don't like to have big chunks in my sauce!


As soon as the meat is browned we're going to make the rest of the sauce.  Turn the heat down to low again and add the two cans of tomato paste (also pre-seasoned...I love my Italian seasonings!) And stir it in. Then pour in the 54 ounces of tomato sauce.  If these happen to include some additional seasoning...go for it!

54 ounces seems like alot.  I know.  But when you're making a layered dish like this, you need to have plenty of sauce.

Leave your sauce simmering, you can cover it if you'd like, until you have everything else ready to assemble.

You should at some point in the process above (I'm not going to tell you when...You're a big girl...work that time management) start a pot of water to boil (with a 1/2 teaspoon of salt) and add the lasagna noodles.  I use Dreamfield brand, because they're low-carb...and I feed alot of diabetics.  For this recipe you'll need about 18 noodles, but to be safe you might cook 20.  This way...if the others break...you've got a couple of spare.

In a bowl pour your 32 ounces of cottage cheese, straining out as much of the extra liquid as possible.  On occassion, I use ricotta cheese instead.  But I far prefer the flavor of the cottage cheese.  Crack one egg into the bowl, and stir vigorously to lightly beat the egg.  The egg is nothing more than a binding agent.  It'll help make this layer stay together.

Once everything is cooked, the sauce and the noodles, turn your oven on to 350 degrees.  I used 2 - 9 by 13 baking pans.  Not too deep.

Now lets assemble the masterpiece!

Using a ladel, pour a very thin layer of sauce on the bottom of the pan.  Then place three of your cooked noodles length-wise on top of the sauce. Now, ladel another layer of sauce on top of these noodles.  Then put a layer of the cottage cheese/egg mixture on that layer of sauce.  At this point, you can either go with your next layer of noodles, OR sprinkle some of the mozzerella cheese.  I'm a cheese lover...so I usually put the cheese next!

Now you'll put three more noodles, length-wise, on top of the cheese and ladel out more sauce.  Don't make the sauce layers too thick, or you'll run out...but don't be too stingy either.  You want a nice full lasagna.

Your next layer is just mozzerella.  Then you'll put three more noodles on top of this layer.  You're almost done!  Pour out one last layer of sauce then use an entire 8 ounce package of Kraft Italian Five Cheese shredded mix.  I love the combination of all of these cheeses, and it makes an excellent topper to our amazing lasagna!

Now repeat this entire process for your second baking pan.  Didn't need those extra two noodles?  Good!  Take them and dip them in any left-over sauce...and enjoy!  It's what I do!

If you'll be eating your lasagna today, go ahead an pop them in the oven for approximately 1 hour, or until the cheese on top starts to turn golden.  If you're preparing ahead, cover them with foil and put them in the fridge.  I don't recommend preparing them more than a day or two ahead.

Once your lasagna has baked, I suggest that you let them set for about 20 to 30 minutes (longer if you can).  They will actually serve better and be more firm if they aren't piping hot from the oven.


Remember, if your noodles tear while you're putting them in the pan...no worries.  You'll be cutting into them anyway.  So just piece them together as best you can and move on.

For a smaller gathering, or just your family, cut this exactly in half.  I promise...it'll still be perfect!

If your mouth isn't watering yet...check this picture out...it should be!


My Mammaw would be proud, I think, and I managed to catch me  husband too!

Tuesday, February 11, 2014

Quick and Easy Tonight!

Months and months ago my cousin, Rachel, suggested that I create a cooking blog.  I laughed it off and said "sure!"  But I was extremely flattered nontheless.  Because you see, we both grew up in this food-filled-family.  And Rachel is, in her own right an extremely talented lady.  In addition to being a caring, loving mother of two rambunctious, blonde, scamps, she's a wonderful teacher who's working on her master's degree. BUT...that's not all!  She's also one of the best make-up artists you'll ever have the privilege to watch at work, with a blog of her own.  I have photographic proof!

So when I say I was flattered, you'll now understand what a compliment I found it.  It took me a while to get up the nerve and decide that I really could do this thing.  I've written before...and I love to write...so I just needed to get motivated.  Well now I am!  And today's menu is dedicated to Rachel's little boy Noah, because he does this happy little dance whenever he hears about "Sloppy Joe's."  And it's the cutest little dance I ever did see!  Here's to Noah...

Some nights, you just don't want a big sit-down dinner with good plates and multiple courses.  But you still want to serve a home-cooked meal.  This is a GREAT option!  It's simple and inexpensive.  And as with a good portion of my menu choices, it includes just one pound of ground beef.  My other ingredients are 1/4 of a large, sweet onion,1/2 teaspoon of salt, 1/4 teaspoon of black pepper, 1 tablespoon of Worcestershire Sauce, 2 tablespoons of ketchup, 1 tablespoon of mustard, 1 tablespoon of barbeque sauce, 1 can of tomato sauce, and 4 packets of Splenda (or a tablespoon of sugar if you'd rather).

Start by sauteing your finely chopped onion in either a tablespoon of butter or vegetable oil on low heat.  Once the onions are translucent, add the ground beef to the pan and turn up the heat!  Now, sprinkle in your 1/2 teaspoon of salt, 1/4 teaspoon of black pepper, and open those 4 packets of Splenda into the mix. Start stirring that around a bit, then add the Worcestershire Sauce.  Cook this until the meat is nice and brown.


As soon as the meat has browned, add the remaining ingredients.  Your "Joe's" should be thick and tomato-y.  Yes...that's my word for today!  Now, I prefer mine to be a little on the "tart" side.  But this is where you'll want to taste and increase any ingredient you feel it needs.  Sometimes...I add a bit more mustard.  And sometimes...I add a bit more barbeque sauce.  But sometimes...it's already just right!

To serve these, I just put the cooked meat in a bowl and put it on the table.  Everyone makes their own sandwich with whatever fixin's they prefer.  I like mine with just a bit of mayo and some sliced American cheese on wheat bread.  My mother likes to add pickles, and leaves off the cheese.  My husband will only eat these on hamburger buns.  To each his own!


Not only is this an easy weeknight meal, it's a great large gathering plan.  You cook the meat, and set out all of the different sides.  Just increase each ingredient exactly for each pound of ground beef.

Eat up!  And don't be too sloppy!